I am having some trouble with my starboard engine, and am hoping some of you who already have old engine battle scars can share some of what you have learned. I have to apoligize first off, because I am familiar enough to know for certain what engines I have. I know, I know... but all the paper work I have on this boat seems to just contradict what the last paper said. 327Q's were original to this boat ('71 31' Hatteras Cruiser). I have paper work, listings, and receipts that all vary. Some suggest that the original 327's were rebuilt, one says they were replaced with remanufactured 327's, while another calls out remanufactured GM 350 4-bolt mains. Most are consistent saying the Port motor was done in '99 and starboard in '02 (though some say the starboard was done in '03). Long story short... the paperwork is not consistent enough to rely on and I'm not familiar enough to know just looking at them.
My issue is, the starboard has started backfiring and losing power as I try to get on plane. Changed the plugs and wires this morning, with no change whatsoever. Pulled the dist cap and shined up the contacts. All seemed to be fairly clean. I've never seen a cap like this... the coil is integrated into the cap. Hopefully some one can give me a quick explain on that set-up and tell me if it's worth keeping or not. Since I'm learning as I go here... I have no idea.
I started pulling plug wires and noticed that when I pulled a wire on the inboard side, the engine would bog down and run rough... like I would expect. All 4 of the wires on the outboard side really didn't make that much of a difference. There was an obvious clicking that started each time I pulled one of those wires, but the engine did not seem to run any rougher. Now doing that process I was fully hoping that this is what would happen when I pulled just one of the wires and that the other 7 would make the engine run rough. Is this telling me that that entire side is not firing like it should? Seems unlikely to me...
Anything ring any bells with someone? What other tests should I do?
All insight is greatly appreciated. Like I said earflier, I'm learning this stuff as I go and anything learned here is one less band-aid needed later...
I rotated the dist cap counter clockwise approx. a quarter inch. That took care of the backfire here at the dock at least. I'll get on the lake tommorrow and see if that helped under load also. If this "fixes" the problem for me, is it a fair guess that I may have an issue with my timing chain? No changes happened before this issue started as far as I know...
That's a standard HEI distributor. Timing rarely causes backfire. The most common causes is crossfire between wires, or LEAN carburetion. If one whole bank is dead, that indicates carburetion. One main/idle jet is clogged.
Timing should be 30-34 degrees, all in by 3000 rpms. This is usually 8 degrees initial, depending on the distributor. Counterclockwise advances the timing.
The distributor cap is easy, all it takes is a new one put on EXACTLY in the same order as the old one is. While you're there, check the plugs, you may find a clue there too. Wires are always suspect, and if they are old crappy wires and the two simultaneous cylinders that fire have the plug wires in physical contact with one another, you'll get an induction firing which sounds like the motor wants to come out of there. Bad distibutor cap will make a motor run very poor, and it won't even want to start if things get bad enough.
Fuel starvation can come from clogged tank outlet port, clogged filter, failing fuel pump, or clogged carb. Follow the fuel line at your motor, many of the systems have a small metal final filter that is intended to be opened and flushed out, which is just good PM.
Backfiring normally is a lean mix situation, but electrical induction firing, whatever, can also cause havoc.
Ha, just posted my note to Steve and saw yours. Looks like we're in agreement, except you know more about it than I do. Thanks again for giving us quality information here on the forum.
Changing plugs and wires didn't make any difference. Rotating the dist cap did get rid of the back firing somehow, but I couldn't get much over 2k rpm today. Plus she was running rough the whole time. Not shake the windows loose rough, but enough that I could notice seat of the pants.
I'm not too sure what to think about the different results when I pull one plug wire. I did the same thing on the port motor that been running fairly well and got similar results. Some wires just create a clicking in the dist when I pull the wire. Others get the same click but also make the engine run a bit rougher.
New fuel filters are in order also for several reasons in addition to the current issue. I'll switch those out this coming weekend. The current filters are the original cartridge type with no water seperating ability, so those need to be replaced out this winter.
Clearly a timing light is in order. Someone suggested I get at the timing a while back, so I need to get at that. I think I understand the basics, but have one question. I've been told to connect the light to the coil wire. Ummm... what coil wire? Bill informed me that this is an HEI dist (thank you Bill!). So, lesson one will be how to hook up the timing light.
Steve
You mentioned you changed plugs and wires. I would diffintly change cap and rotor. Make sure you use a good quality distributer cap and rotor. These are standard GM HEI cap and rotor. The cheaper brands are known to cause problems, rotors usually burn through on underside and cheap caps get carbon tracking on inside and can cause lots of problems. If your old ones look good save for spare or buy an extra for onboard spare in case of failure.
Timing light gets hooked up to number one plug wire, not coil wire.
If these distributers were taken out of a car the centrifical advance may not be correct for a marine application.
Make sure you are using the correct number 1 cylinder and timing mark. I believe the Q motors are not standard gm cylinder numbers. Also verify correct Q Motor firing order as this can cause some of the situations you describe.
We checked the firing order just to confirm. After getting through some confusion over which direction the motor is rotating in (original 327Q manifolds were reused and the manifold with the QL serial # was installed on the starboard motor - causing a "what the?" moment), we confirmed that the order is correct to the Q motor per my manual. Your comments make me wonder if the order is different on a Q motor vs the standard GM 350 order, which should I be setting up for since my original 327Q's have been replaced with GM 350's? I'll look up the firing order for a 350 here in a sec, but from what I can see the only difference is just the motor is "backwards".
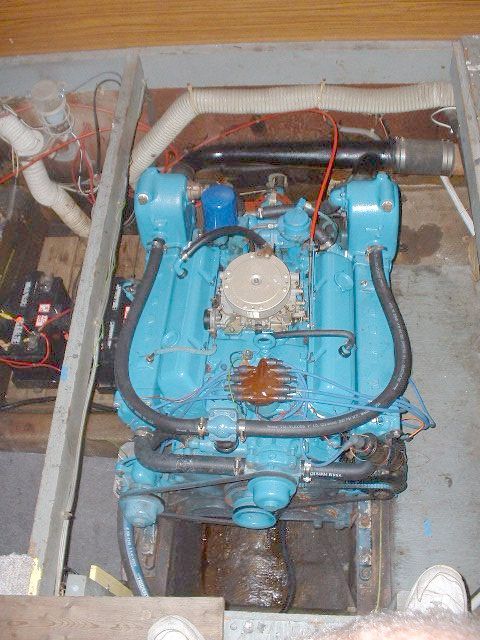
Well first things first it is a Q motor and if it is your starboard motor it is std rotation or should be. That said firing order is 1-5-6-3-4-2-7-8 from the pictures you posted I'm not sure where number 1 is on the cap but I suspect it is lower left at approx 9 o'clock which seems a little out of place but who knows with that HEI distributor. It doesnt matter where it is just that it is timed correctly and the firing order is correct. The Q firing order is essentialy the same as std gm firing order but the cylinders are renumbered to make sense for the placement of the motor number 1 cylinder is front inboard side for you and they are numbered odd on one side of the block and even on the other as in 1-3-5-7 down the inboard side and 2-4-6-8 down the outboard side. To set the timing on the Q there is a pointer at the front of the motor which should line up with a dimple on the flywheel marked with an R. Use the opening on the right to shine the timing light in. You will see the pointer inside the window.
Here we have the Starboard motor on SHADY LADY, my Dad's 31� Commander Sedan. Naturally you can tell it�s the starboard motor because of the direction of exhaust discharge. What also appears to be obvious, is the fact that this Chevrolet based motor has the distributor at the front side of the motor (as it is installed here), and since we all know Chevrolet put the distributor in the wrong location for automotive use (at the back of the motor where it is very difficult to get to) it appears this motor is running the transmission off the front of the motor, if we use the original automotive installation to establish what front and rear really are for this motor.
Therefore we have a Q motor sitting on the starboard side, running the prop in a RH direction. Is this a RH motor? I contend it is a RH motor as installed and as hooked to the transmission, but it is a LH (standard rotation) motor if you take it to the machine shop, open it up, and look at the cam, and whether or not that motor has chain drive (standard) or gear drive (opposite hand) for the camshaft.
Am I right or wrong with this?
Here is another one, only this one is a turned-backwards Q on the Port side, spinning the prop in a LH direction, but the cam thinks it�s an opposite hand motor and so does the can gear that drives it.
Now that I stuck my neck waaay out there, Mark, give me a hand willya? I need to know whether I�m right or wrong on this one. Thanks for being kind!
Give up the left hand right hand thing use std rotation vs opposite or counter rotation then you won't have that problem. Simple enough answer.
OK here goes when you are speaking about Q motors CHRIS CRAFT defined them this way at least in my boat and all the rest I have seen and in the manual. the STBD motor is a RH rotation and the PORT is a LH rotation but remember they have been turned around to take power from the nose of the motor. The RH rotation motor uses a timing chain to drive the cam and is therefore a std rotation motor the LH motor uses gears to drive the cam and is therefore a counter rotation motor. Thats why I dont bother with LH RH I just use std and counter rotation. What Chris Craft was trying to do is keep the terms the same so as it says in the manual "Rotation from shaft coupling end" so essentially yes Paul you are right.
I was afraid you were going to tell me they reversed the cam and the intakes on the Q motors and the distributor was run off the other end of the motor, ha.
So I've done some boning up on HEI distributors... many thanks to those that got me pointed in this direction. I've noticed that mine do not have vacuum advance. Is that typical for marine motors? I think I understand what they do and why. It seems to me that having vacuum advance would have some benefit on a marine motor also...
Right now I'm debating between rebuilding the units IO have with a Summit upgrade kit or purchasing new distributors w/vacuum advance. While I've learned a good bit recently, I'd love to gather some opinions from those of you that have been through this...
Vacuum advance distributors are not used on marine engines because a marine engine is always under load. Vac advance is used to advance timing under no load or low load conditions in cars and trucks to improve fuel mileage and driveability. Intake vacuum will drop as engine load increases so the advance unit will not be working anyway, on the boat engine.
Someone probably removed the vac advance unit from your units.
I have never seen a marine version of the popular GM HEI distributor, others may have, but my impression of them is they are not normally a marine application. So be careful with the timing advance curve, some of them have a pretty health advance curve. Not necessarily right for a boat. Bill gives good advice on the max advance.
That distributor also may not have any spark protection, so keep that in mind. If there is ever a fire on a boat, with injuries, the lawyers have a habit of looking at non marine modifications to find a person at fault. This includes everyone who layed a hand on the boat in the past.
Good advice. Is the carb a marine spec carb? Fuel pump? The main difference is the way venting is handled. Gasoline fumes and overflow are contained into the carburetor bores on both marine carbs and fuel pumps. Combine non-marine fuel system items with non-spark protected electrical stuff and the potential for problems escalates exponentially.
Automotive stuff functions the same as marine stuff, and is physically identical. However it lacks the proper protection for marine applications.
Yes there were some marin delco HEI distributor conversion kits available from a source on the net
The later Chevrolet TBI seperate-coil distributor, along with distributors for some other engines, use an 8-terminal module. Delco sold a marine distributor kit to upgrade older boat engines to electronic ignition, it was called the Delco Voyager Marine Distributor Ignition System. Kits were available for 2.5 and 3.0 liter 4-poppers (P/N 10457090), 4.3 liter V-6 (10457091), Small block Chevy (10457092) and Big Block Chevy engines (10457093). (the only difference between the small block and big block kits is the ignition coil--because of a different mounting bracket) These marine ignition kits relied on the timing curve built into the module for all spark advance. Sadly, these kits have been discontinued. It would be possible, therefore, to run a race-only engine using the modern 8-pin module and no computer, using the timing curve built into the marine module. Because there is no counterpart to vacuum advance, this would be a very poor choice for a street-driven car or truck.
So there is the possibility that his are marine distributors. No idea how to tell if they are or not for sure without more research. I did find parts available at several different locations boatfix, marineengins etc..
Ok... rebuilt the distributor last night with a kit from Proform. New cap, rotor, coil, weights, and springs. I then set the timing at 0. Someone had mentioned that it should be around 8-10 at idle, but I don't have any way to gage degrees yet. Need to get some sort of indicator attached.
Regardless... no change. She's still running rough and can't get more than 2000 rpm underway (she'll run right up and over 3k out of gear). So, back to the slip to start digging into the fuel side. 2 filters on this engine. Primary is an old brass Groco with a secondary canister unit on the motor before the pump. Drained the Groco and it was like draining a manifold the way I had to jam a small screw driver up in there to loosen up the crud to get it to drain. Didn't take that to be a good sign. Removed the cover and pulled the filter canister out. Full of crud. So I kept a small trickle of fuel flowing while I scrubbed the Groco housing clean. After cleaning everything out we ran the fuel we had in the bucket through a coffee filter to see what was in there. Looked like mud... probably 2 teaspoons worth. These was obviously 2 layers in the bucket after filtering... a nice clear top layer and a dark rusty / muddy layer underneath.
If anyone has a picture of a Groco filter (GF 376 is what I need), I would love to see what one looks like. The filter that was in there seems to be more suited for the on engine canister than the Groco unit. Speaking of the on engine filter... pretty much more of the same crud, but less water.
I only had one filter left from the previous owner, and that fit in the on engine unit. So we closed everything back up to take a quick spin. I know... no filter element in the primary. This will be corrected before we run it again... especially considering the mess we found when we opened everything up. Hopefully it's more negligence by the previous owner than a dirty / degrading fuel tank issue.
All that and the starboard engine still falls flat on her face around 2k rpm while the port will run right up to 3k with no issues. Talk about frustrating! I had to lean back at the helm, arms crossed, stewing... while the boat went in a large circle. Good thing the season is over up here more or less. The boss was grateful that no one was around while we cruised in circles as I pondered... lol.
So I plan to get some sort of degree markign system to attach, and set the timing to advance to approx 30 at 3000 rpm. But, I don't expect that to make the difference I'm looking for. It's definately more of an issue when under a load. I also noticed that the throttle response is not as quick or crisp as it should be... even at idle.
Any new information here that helps identify the source of my issue?
As always... thanks for any and all input and opinions.
Got the light and have it timed to TDC. I plan to run out to one of the auto stores today and see if I can find one of those stickers that lay out the degrees. I'm hoping to find a way to cheat before bringing on the math. Once I have her running respectable, I plan to play with the weight springs some to fine tune things and I'm thinking one of those stickers will make that easier.
I sure hope it's just a matter of advancing the timing. It seems odd to have it go south quickly like this...
I'm not real familiar with the "Q" setups that drive from the front of the crank..is this what you have? Can you see the damper? If not, can you see the flywheel and count the teeth?
Make sure you have a real TDC..The procedure is find #1 cylinder, stick something in the plug hole that stops the piston about 1/2" down. Turn the engine one way until it stops, make a mark. Turn it the other way until it hits, make a mark. HALFWAY between these marks is an accurate TDC. Do NOT try to find tdc by maximum height of the piston..this is inaccurate because of all the slop at TDC..rod crossing tdc gives no vertical movement relative to the crankshaft rotation.
Retarded timing gives the engine that "lazy" feel. You want the timing to start advancing at 1000 rpms, and all in by 2800-3000. I'd go for 32 degreees total with non-vortec Chevy heads and 89 octane. I run 36 degrees in my Small block Ford.
Gotta 4 bbl? Secondaries open with air flow. Retarded timing won't let the engine run up enough to have sufficient airflow to open the secondaries or meter fuel properly.
There's always the old "power timing" method. run the engine 3/4 throttle or so. Advance the timing (turn the distributor) until the rpms don't increase any more, then back off a degree or two. That's actually the most accurate way,
Oh the days of tuning by ear....back when I was single, running hot cars like a bandit!
I had a couple of nice ported and polisied cylinder heads and hot cams back then, darn motors would rev as quick as a chain saw.
One thing about the flywheel measurement and all, I would be careful about the automotive store, generically, because the Q motor has so many different features, it may well be running a smaller flywheel, and that would throw off any use of standard tape intended for a larger one.
I just offer this for whatever it's worth.
I appreciate your detailed postings, by the way, that is good stuff for the archives next time I update them I'll draw attention to them.
I've taken a couple of pictures to show where I'm looking at. There is no way for me to get a good look at things unfortunately... especially with belts spinning.
Here's a shot... flashlight is pointed at the opening where I can see the TDC dimple.
Finally a shot of the opening itself. Nice indicator, but no way to get a good look at anything. Upside down shot as I was laying over the top of the engine to get this.
You're idea of dialing it in at 3/4 throttle I think may be a good idea for this instance. I've never heard of that before, but it makes sense.
No worries about me getting a degree tape that isn't accurate... nobody had any idea what I was talking about. Correct me if I'm not getting this right, but the degrees we're talking about are based on 360 degree circle... right? As long as I got my TDC right, a degree is a degree? I'm thinking of putting a marker on a string and draw a nice arc through the opening where the dimple is and use some math to put in some tic marks. Thinking about how big of a window I have to see the dimple, I'm not sure I could see 30 some degrees. Yeah... 3/4 throttle dial in it is!
On my 327F I could not find the dimple until I moved the flywheel a couple teeth at a time with a long handle screwdriver. Once I found it, I reamed it out and filled it with white paint.
If it happens to be a non CC motor or a crate motor, for instance, then the dimple ay not even be there.
Steve, after you power time it at 3/4 throttle, if ya got the cohones, you can do the same at full throttle. If the timing is all in by 3000, it should be the same, but that is the ultimate method. In practice, initial timing is set ONLY for convenience..what you're REALLY after is correct timing at cruise/full throttle.
You'll have to reset your idle settings after a timing change.
I ran her up to 3000 rpm (should be 3/4 throttle). Started at pretty clost to TDC. Use the cap screw as a reference in the blow pic.
Rotated the cap to where the rpms peaked... picked up about 120 rpm. I could rotate slightly more than in this pic and keep at 3120 rpm before.
Throttled down to idle and the engine wouldn't keep running. I had to bring the cap back clockwise to the position below to keep a good idle. This put me at about 3050 rpms.
I've had the cap in this position before (before putting a light to it and knowing where TDC was) and still had the issue under laod. So, I'm not expecting to see a big change. Does this appear to be the amount of cap rotation you were expecting to see? I have no idea what a lot of rotation is to be honest. I was hoping to find that I needed to rotate the cap well beyond where I have previously, but beyond the furthest spot I show above she starts losing rpm and you can feel/hear a difference as the engine starts to run rougher.
The distributor turns at 1/2 the speed of the engine..1 degree of distributor is 2 degrees engine. That looks like what I would expect. It should idle faster with the timing advanced. Double check your firing order..pull each plug wire from the cap one at a time to see if you have a dead hole. If you pull the wire from the cap it wont shock you.
Tell me again the history of this motor..has it ever run up to normal rpms??
I reread your previous posts. I suspect you have some wires crossed. The best way to find the real firing order is pull the plugs and see which cylinder is on the compression stroke, and then check to see that cylinder is firing. Reverse rotation engines may use a different firing order..remember each piston comes up twice during a 4 stroke cycle. Both Ford and Chevy have alternate firing orders depending on the camshaft used. The apparent firing order can change depending on how the cylinders are numbered. It's alot of work, but is definitive.
Bugger... that does sound like a lot of work. I'll check them over compared to the manual again. I do want to make sure I am following what your suggesting. Let me type this through to make sure I got it right. Pistons come up twice. First time is my compression stroke and when it peaks... that's when that cylinder fires. 2nd time is the exhaust stroke. Right?
So if I start with my "dimple" at TDC, my cylinder #1 should be at the point of firing. Hook that wire up to the cap on the post that the rotor is contacting. Then it's just a matter of looking to see which head tops out next? How can I be sure it's not on the compression stroke?
I have very little history with these motors, unfortunately. This starboard motor is a remanufactured block put in in '03. Fuel pump and carb look like maybe they are original. Alternator and dist are not original and look like they were put in when the new block went in. I have not been able to get more than 3200 rpm out of this motor since I purchased the boat earlier this summer. This motor was the smoother running, easier starting of the 2, and I got a couple months of good running out of her... albiet only to 3000 rpms. I can get to 4000 and probably even further out of gear.
I did have an issue with this motor cutting out when docking near midseason. After running for awhile the motor would idle rough and stall here and there. The idle was set pretty low, so I adjusted to idle at 500 in gear. I also sprayed some carb cleaner and changed the oil on both engines as I started the process of getting this boat back into shape. For awhile there, it seemed the more often I used it the better both engines ran. I was hoping good use and fresh fuel was making a difference.
Then last weekend I couldn't get on plane all a sudden, and the motor was back firing like crazy. Even at the dock it would backfire if I revved it up some. Rotated the dist cap ccw a bit and that took care of the backfiring, but still not idling smooth and no power in gear.
Add the new plugs, wires, all the dist stuff I did this weekend, and now you know what I know... lol. I did notice last night as we were coming back into the marina that there is quite a big difference between the 2 engines when going into and out of gear while manuevering. I gotta tell ya... I still grin coming in and swing that old boat around into the slip without touching the wheel. Twin inboards beat the heck out of the Bravo One I'm used to... even if one is running like crap. Anyways... I'm just drifting into the marina basin. Slide the port engine into gear and the boat gently (and quietly) curves to starboard. Pull out of gear and coast a bit. Slide the starboard into gear and it sounds like a slow turnign diesel.... Chug, Chug, Chug. You can feel every chug vibrate through the hull. Surprisingly, the boat turns significantly faster to port. So the starboard engine that falls on it's face at 2k rpm seems to have good power at idle. Idle speed seems to hold steady and is close to the port motor.
Something must have changed to create this issue. I can not think of anything did that would have impacted the engine at all. Changed the water pump for the house system. Installed a new charger. Cleaned the bilge (you wouldn't believe the crap I pulled from the bilge). Pulled a rats nest of wires that were on top of the gas tank connected to nothing... with 2 wires sparking as I grabbed the mess of them! I did get some water on top of the engine while cleaning one time (actually... the wife heard me complaining about how hot it was down in there and she thought I'd appreciate a good hosing off). I know how standing water can mess with the coil packs on my truck motor, but I can't see where that would be a big deal for this old motor.
So... anything in all that give an "Ah-Ha" moment? For what it's worth, I plan to switch the carbs between the 2 motors next weekend.
Looking back I didn't answer a couple questions asked. I have found the dimple. It's actually a hole on this motor. I only have that small window to look into, so I can not see any teeth. I'm assuming the flywheel that has the teeth is behind that cover where my timing mark is?
Thanks for the time you have taken with me. You have helped me learn a ton so far...
I added the firing order chart again to be helpful.
On most CC motors the dimple is the mark you go for at 500 rpm, it does not signify TDC.
with all I have heard, I am still not convinced you have more than one issue going at the same time. Fuel delivery sounds horrible when you started in, with the filters so crapped up you know the carb is crapped too. I'll bet you are astounded to see what is in there.
Secondly, if the motors would NEVER go above 3000, you are overpropped, almost certain. I think you should continue to work on the tuning issues, would be very suspect of the carb and filter system, as noted earlier backfiring is sypmtomatic of lean fuel delivery, and if you have not changed the cap too, you should.
Based on all you have noted, doing the timing by ear thing, I don't think you will find the sweet spot that will suddently give you another 1000 RPM. You have something else going on.
That's my hunch.
I recently put a 14 x 16 prop on my 210-hp 327F powered 20-foot glass Sea Skiff to see what happened. The motor would only turn 2200 RPM and all I could get out of a 40-mph boat was 27 mph. I could not believe what a differnce that prop made, even though it didn't look all that much more of a pitch, it sure was. In any case, checking the props should be on your list! Gear ratio is also very important too, especially if it has been changed somewhere along the line.
I think your right about a couple things going on here. I figured I better re-aquaint myself with the local prop guy when we couldn't get much past 3k rpms.
Then I got a good look at the bottom when we had it pulled to get a cradle fitted. You wouldn't believe the amount of bottom paint on this thing! I may very well get all 1000 rpm's I'm looking for by just blasting the bottom. There's gotta be a coupla hundred pounds of paint... lol. Plus it's cracked and pitted so bad it may be more turbulence I see behind the boat than prop wash.
So, I got a date with the sand blaster guy later this fall. Get the bottom cleaned up, spend a couple days learning how to get some layers of epoxy barrier coat on nice and smooth, then I'm thinking of trying some VC-17. It's very popular with the sail boaters here, and getting more so with some of the power boaters.
Any way, I want to see what that and some carb work over the winter will do to the rpms. Then I'll give the prop guy a chance to impress.
I still think something happened that caused this change. I'm really hoping to find the port motor acting up when I switch the carbs next weekend. That way I'll feel better about giving them to someone to work on over the winter and expect things to be better in the spring. If it doesn't move with the carb, I really want to track this down before winter so I can work on fixing it over the winter.
Thanks for the firing order... that jives with what I have. This is typical of all small blocks I believe, so even with a reman block I should be set with that order.
Backfiring is almost always electrical, unless something serious like a bent/stuck valve has occurred. Some Chevies have a problem with wiped camshafts. Where is the backfire? If it's in the intake, that indicates either crossed wires or poorly seating intake. The decrease in idle stability indicates a possible intake valve problem.
I think a more extensive investigation is in order. The fact that pulling plug wires from the cap has no effect on one bank is a serious tell. Mechanical problems are much more rare than simple electrical stuff, therefor I still would check the firing order first. Perhaps a compression check on the dead bank is in order while determining the true firing order.
It's very easy to damage a camshaft during break-in. The timing chain could be a tooth off. All speculation.
I'd check the firing order by checking compression strokes. Perhaps pulling the valve cover on the dead side may help. It will show the true firing order, and any bent/stuck/improperly opening valves will be apparent by looking at the actuation of the valves, the height they sit at, and the amount they open.
I'm pretty sure the backfire was in the carb. You could hear it clearly with the deck hatch off, and we even saw a slight black puff of smoke make it through the flame arrester one time.
If one bank is "dead". and it's backfiring through the carb, there MAY be a serious blockage of the exhaust on that side. I'd suspect a hose that has delaminated and is acting like a flapper. Over heated exhaust hoses fail, but no one checks them after they have replaced a water pump that failed. Had exactly the same issue without backfire. I found the problem instantly when the hose blew off...........
you are right about the delam of black rubber woven hoses, wire reinforced or otherwise. They can look good on the outside but be trashed inside. However, would that cause both motors to only reach 3000?
I would love to have a good indicator like a hose blowing off right about now... lol. I have never heard of that before. I did go over all the hoses and connections earlier in the summer, but that was more of a quick once over with the intent of staying afloat. None of the hoses looked like they were about to let loose, but it is in the plan to replace all of them over the winter. A couple of them were softer than I would have expected.
Yesterday at the dock, I fired up the motor and let it idle for awhile before starting to play with the dist cap at 3000 rpms. I noticed that the exhaust was "spitting" water further than usual. When i got a good look I could see that the exhaust was "pulsing". So water would surge a bit into the exhaust opening and then the exhaust would blurp it back out. Before the exhaust was much smoother and there wasn't nearly as much water flying out of the opening.
I figured this was just a symptom of the rough running idle. It certainly could be from a delaminated hose too. It could also explain what "changed" that caused this motor to suddenly lose power. I agree that it wouldn't explain why both motors are not getting much more than 3000 rpms, but that was the case before the starboard motor started having this problem. Pretty sure I got lots of other issues that will explain not being able to get full rpms.
So I'll be swapping carbs and pulling hoses this weekend.
I switched the carbs this weekend. However... not even Texas was big enough for Ike apparently. Since I was on my own, I did not want to fight the wind and rain that was left over from Ike here. It did seem that the starboard motor now idled and had better throttle response. I will get a chance to go for a run this coming weekend and see what we see.
While messing with the carbs, I decided to try to clean up the fuel system some and have a couple questions. How flexible should a fuel hose be? The 3/8" hose between the Groco filters and on engine filter were much softer than I wuld have expected... I could pinch them closed with my thumb and forefinger. I didn't like that so I replaced those lines on both engines. The lines between the on engine filter and pump and between the pump and carb are all tubes (copper?). Some of those look like they have taken some abuse... can I replace those with rated hose? Or do those have to be metal tubes? Also, is pipe tape necessary with the threaded connections on these tubes? I cleaned all that crap out and reconnected with out using tape and so far they are not leaking.
The hoses shouldn't be THAT soft. They could be sucking closed and causing problems, as they are on the suction side of the pump. The lines should be steel..copper has a tendency to vibrate and break. As long as they aren't pinched shut I wouldn't worry about the steel lines. Pipe tape shouldn't be necessary if the ends are FLARE fittings, which they SHOULD be! If they leak without the tape, try taping them. Better yet, reflare the ends.
The hoses were most likely breaking down due to ethanol, the newer A1 fire alchohol hoses should take care of that problem. I used Parker 221fr (fire retardant) hose with reuseable fittings.
Indeed the hose should be a product such as pictured, with quality AN type fittings. The other reason for a squeeky clean neat installation such as pictured is it protects the lines from exterior damage and deterioration from laying in oily, salty bilge water. Sounds like someone put some automotive rubber vent hose in the system.
Don, what size are those tanks? Is that Bilgecoat on the hull?
The tanks are Moeller 50 gallon plastic they are 22" tall X 12.5" wide X 45" long almost perfect for a 31 but the filler neck sticks up another 2.5-3" so it was a bear to install the fill hoses. I'll take some shots of them. As for the bilge that is gray Rustoleum below the spray rail and white above.
So the carb swap hasn't helped any. I finally got a chance to really run the engines and still could not get the boat up on plane. Starboard motor would slowly run up to 22oo rpms or so and fall back down to 1800. Same performance I had before switching the carbs. I'va also changed all the fuel filters and hoses.
Disappointing to say the least. The boat is being pulled for the winter this weekend, so anything I do here on out I will not be able verify on the water.
After winterizing I will be taking the exhaust hoses off one by one to check the condition inside and look for delamination. I might end up replacing the hoses anyways as a precaution / PM... I have no idea how old these hoses are. We'll see what they look like.
Carbs are coming of to be rebuilt. They aren't the cause of the starboard engine falling on it's face, but they definately need some help. Most of the linkage are not moving freely and I have some concerns with the chokes also. These seem to be heat driven chokes with a tube running into the valve cover. Right now that tube is half the size of the hole in the valve cover and just are loosely sitting in that hole. Should that be tightened up with a grommet or something?
Another question... both engines have started to smoke. Neither have all summer, but I am now seeing some black smoke from both exhaust ports. It's definately black (vs the blue I would expect to see if I was burning oil). Could something related to the colder weather / water be causing this? Rev it up and I get more and it only reduced slightly as the motors warmed up.
What temp should these motors run at? Gages are showing 130-140 water temp, which is quite a bit lower than I am used to. Both motors are consistent... just seems like a low temp to me.
Black smoke is gas..wayyy too rich. I think you've gotta lot of problems to address. If the engines aren't making any power, they will run cool. Time to look at plugs..probably black and sooty. The oil gets contaminated from a rich condition. The choke does NOT get heat from the valve cover...intake manifold maybe.
Steve
You may want to run a compression check. It sounds like you may have a couple of burnt valves. This may cause a lot of your symptoms, tick noise when wire off, popping back thru carb, loss of power under load. You can rent (for free) a compression gauge from most chain auto parts stores, Autozone, Advance, Pep Boys, usually you just leave a deposit (cost of a new one) and they refund back when you return it. If you have low compression it would give you all winter to get the heads rebuilt.
Rob
The Eagle's Nest
I had a compression check done before buying in June. All were between 155 - 165. Not to say that something hasn't changed. Obviously something has. I'll do another check and see if one has fallen on me.
I pulled the plugs, and they did look like crap. Wet and black. Not burned up at all though, the electrodes looked fine.
Be sure valves are set properly, and chokes are open
October 8 2008, 3:18 PM
You would not believe how poorly the valves could be, and the motor still run, however bad valve adjustment can really detract from performance. I would check valves first, and then do compression test (warm motor, at WOT setting preverred, with coil unhooked.
The smoke you see (and undoubtedly smell) is a rich mix, and if the chokes are closed or partially closed, that would account for the poor performance and smoke too.
I think we finally got this figured out. I've been taking hoses off to see if any have delaminated. The overall condition of the hoses (and clamps) has convinced me to replace the whole system. I never did find a hose I thought could be causing the engine to fall on it's face, but I did find an issue with a fiberglass muffler. Not sure it's a muffler, it might be more to reduce water surging backwards. Probably a combination of both. Either way, I pulled the first off from the engine that's giving me troubles and peeked inside. Looked like flow was directed up a bit and then back down. I was a bit suspicious when I shook it and it rattled pretty good. Stuck my hand in there and could move a section around quite a bit.
This past weekend I got around to taking off all the exhaust plumbing on the other engine. I was pretty anxious to get a look into the muffler on this side. Sure enough, flows through straight with a couple delfectors. I'll get a couple pics up tonight, but I sure think this could be my problem. Unfortunately, won't know for sure until this spring when we launch.
The cast elbows and y-pipe weigh a ton. Has anyone replaced these with fiberglass tubes? I'm leaning towards using fiberglass for the 90 degree and y-pipe and blue silicone hoses. This increases cast a good bit, so if there is any concern with longevity I would rethink this.
My use of the fiberglass 90-degree bend is positive so far
November 10 2008, 11:11 AM
Just a note on the use of the silicone hose and fiberglass bends, I used those on my 38 and so far I can not see any deterioration or change of color. Everything appears to be in good working order. The resin they use is obviously a very high temperature resin, and it seems well suited to the job they're asking it to do.
From your description it certainly sounded like a plugged exhaust. However, delaminated hoses are more common. Congrats on getting to the root of the problem.
Anyone remove something like this from their exhaust system and live to regret it? I'm thinking of just eliminating these and running a straight pipe (hose) from the collecter. Risers are tall enough where I'm not concerned with water backing into the engine. I like hearing my engines run, but do not want it to be all I can hear...
........you'll either love it or hate it, and I suspect it will be too loud but you won't know until you hear it.
From the helm our 38 with standard cast iron mufflers sounds real good.
From sitting on the aft deck all you hear is motor.
The motor-head that I am, I've been tempted to remove the mufflers from the 38, but I'm afraid passengers on my cocktail cruises would be compromised. Right now the drone of the 427s running from the helm is actually quite impressive and nice. Sitting right back against the aft rail, however, gives you a stereo rendition that is quite a bit louder. Without mufflers I'm afraid it would be too much, but actually at speed those mufflers are blowing straight through anyway. They're probably only really effective when the boat comes into harbor. Hmmmmmmm.................................


![[linked image]](../../../../../../img.photobucket.com/albums/v472/Dogsharks/Boating/90closeup.jpg)
![[linked image]](../../../../../../i457.photobucket.com/albums/qq291/guyerst/DSC_0020.jpg)
![[linked image]](../../../../../../i457.photobucket.com/albums/qq291/guyerst/DSC_0016.jpg)