

Rev A 9/27/2019
Rev B 4/30/2020 Install description and service tip
Pertronix Ignition System
I converted my 1959 lincoln to a Pertronix II Ignition system
Pictures to follow Installing etc..
45011 Ignitor II Coil
91281 Electronic II Ing kit
10001 Coil Bracket (optional not required)
It is Hall Effect Electronic switching unit to switch the coils primary circuit Vs: mechanical point switching.
To you M-E-L enthusiasts it’s a Hi –Fi Ignition system.
More about Pertronix:
If you have a Petronix Ignitor, you need to bypass the resistance wire or the inline resistor. The Ignitor needs 12 volts, but the resistance wire typically only puts out between 6.8-7.2 volts. The reason it seems to be working is because the starter solenoids will output 12v during cranking. This was to create a hotter spark during start-up. But then once you are done cranking, the resistance wire takes over supplying only 7 volts to the points to prolong the life of the points. Since the Ignitor sees that 12v during cranking it would wake it up but running it continually on 7 volts will eventually lead to it failing.
The stock coil needs 7 volts. They will handle 12 volts at cranking but continual 12 volts will burn them out. The OEM coil will get 7 volts from the resistance wire / resistor.
The problem arises when you go to an aftermarket ignition (like the Pertronix Ignitor) which requires 12 volts. The solution is that aftermarket coils have an internal ballast which means even though you are putting 12 volts to the positive terminal on the coil, they go through a resistor inside the canister which then only passes the 7 volts to the internal winding. The result is that if you keep the factory resistance wire you are only putting 7 volts to the Pertronix positive post, thus only transferring 4-5 volts to the winding which will result in a misfire at higher RPMs.
How do you fix this?
Bypass the resistance wire or the ballast resistor. You then can pass a full 12V through to the ignitor/coil.
If you are running a Pertronix Ignitor with a stock coil, you will run 12V to the Ignitor, but then pass it through a resistor on the way to the coil.
The better solution is to upgrade to the Pertronix coil as well as eliminating the in line resistor.
Pertronix 1 Module is nothing more than a pick-up with an amp circuit to trigger a switching transistor...which replaces the mechanical points. It converts the Ignition Coil Switching from Mechanical to Electronic. It is a great Technical advance for switching the circuit. Very few devices use mechanical switching today and if your computer were to use that type switching, it would take up 6 city blocks.
Probably the best performance modification for the $$$ that one can make to M-E-L or any car with points..........There is no comparison to the two systems.
The Pertronix II System has a micro controller, additional circuitry that also adjusts the dwell / spark timing through the RPM range ...With circuit protection as well.
A very cool device.
Warning:
You do not want to use the Pertronix II with Solid Core plug wires. However most wire sets we use are resistor type wires.
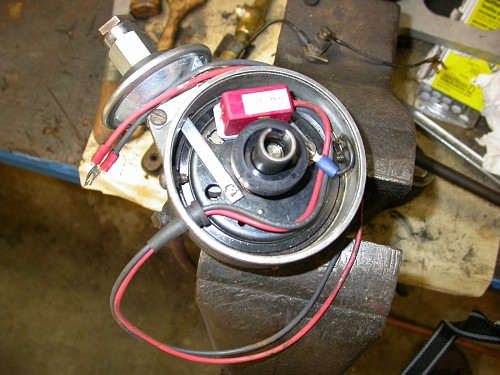
Read the directions carefully from the manufacturer. It takes all but 10 minutes to install.
Simply remove the points and condenser. There my be a small braided ground wire, remove that as well. Install the module. Use the plastic feeler gauge provided to set the distance between the module and the magnetic sleeve. Your good to go.
Service Tip: Carry the points and condenser in your vehicle in case you ever need it.
